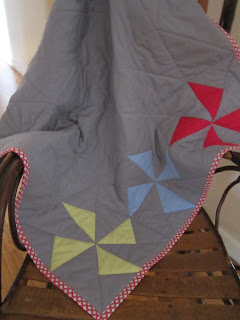
This stroller size quilt was made using six pinwheel blocks (tutorial available here). Since it is a simple design using kona and bella solids, I wanted to add a little pizazz with the binding. Checkered organic cotton from Laurie Wisbrun fit the bill.
Here is how I apply binding.
CUTTING
Cut enough 2 1/2" strips x WOF (width of fabric) to go around the circumference of your quilt. If your quilt is bigger, and you want a deeper binding, cut the strips 3" wide x WOF.
JOIN STRIPS
Put two strips right sides together, one strip horizontal, and the other vertical, and stitch at a 45 degree angle where the strips cross.
Trim seam to 1/4" and press to one side. Join all the strips in the same manner.
 |
| I marked stitching line for illustration purposes |
Fold joined strip in half, long edges together, and press.
BINDING THE BACK
On back of quilt, starting near the middle of one side, align raw edges of binding on quilt edge. Make sure that joined seams are not on, or close to, the corners. Trying to miter a joined seam is not pretty.
Leave at least a 8" overlap at beginning and ending tails of binding. This is to make the final join easier.
Take pinned binding/quilt to your sewing machine. Leaving about 6 inches of beginning tail loose, start sewing binding to quilt with a 1/4 to 1/2" seam depending on your edge consistency. Sew a few inches, and then check to make sure that your stitching is deep enough to cover the edge properly.
MITERING CORNERS
When you get close to a corner, stop sewing (1st photo) and take quilt out from under the needle. Fold binding up at a 45 degree angle as shown in the middle photo below. Crease the fold with your fingernail to mark. Open binding back up, and stitch until you reach the creased fold mark. Backstitch and take quilt out from under the needle, snip threads.
Turn quilt 90 degrees to stitch next side of quilt. Fold binding back on itself as shown in the 3rd photo. Start stitching at top edge of quilt and stitch until you reach the next corner. Repeat previous steps to miter all four corners.
JOINING ENDS
When you reach the 4th and final side of quilt, stitch a little ways and backstitch to secure, leaving about 7" of binding tail free. You will be joining the two free ends in a 45 degree angle as you did with your previous joins. The method of doing so is a bit different though.
Cut end of the left tail at a 45 degree angle. Then overlap it over the right tail. Draw a pencil or chalk line along the cut 45 degree edge on the bottom right tail. Move left tail, and draw a second line 1/4" to the left of the first line. Cut right tail on this second line.
Pin the left and right tails right sides together along these 45 degree angles. Stitch on remaining pencil line. Fold binding long sides together and press. The binding should now lay flat and correctly fit the last side of the quilt.
Finish stitching last side of quilt.
BINDING THE FRONT
Fold your binding to the front and pin a section to start. As you can see, my edge has been serged because I find it easier to bind, but you don't have to do this step if you don't want to.
Stitch close to the edge in a color thread that blends with the binding. In this case, I used white thread.
When you get to a corner, fold the binding as shown, at a right angle and finger press. Stitch up to your seam allowance, backstitch, and take the quilt out from under the pressure foot.
Turn binding from next side on top of the binding you've just stitched at a 45 degree miter, and pin to hold in place. Put your needle back in at the inside corner, backstitch to secure, and continue stitching down next side of quilt.
Here's what your corner should look like.
Continue stitching all the way around your quilt, mitering each corner. Backstitch when you reach the place that you began. Voila, a binding suitable for your wonderful quilt!
Happy Quilting ♥


I'm no sewer or quilter, but I always love seeing your finished pieces! I love the pops of color with the pinwheels and binding. This quilt is more timeless than traditional baby blankets :)
ReplyDeletethis is a great tut, I am glad I found it, ty! I was wondering how the stitching looks on the back though when done.
ReplyDeletejust what I needed
ReplyDelete