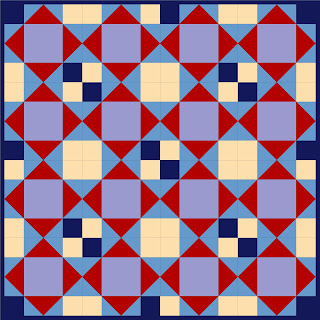
The Block of the Month #8 project is a little girl's pillowcase dress made with eight Broken Dishes blocks.
Dress will fit size 6-8 girls. If you would like a larger size, add more quilt blocks.
This is a good serger project, (you will see that I use a serger throughout). You can also make this dress with a regular sewing machine, but you may want to finish the raw edges of the blocks with a zigzag stitch to keep them from unraveling after washing.
Here is what you will need to make the dress.
MATERIAL:
Choose three coordinating fabrics. I used organic cottons from
Laurie Wisbrun's Modern Whimsy.
CUTTING
For the triangles, start with a 6 7/8" square. Cut the square in half diagonally to get two triangles. So, for example, to get the number of red triangles pictured above, you would cut eight 6 7/8" squares, and then cut them diagonally into 16 half square triangles.
Do the same with the blue triangles.
For the red and blue triangles at top, you will need sixteen 6 7/8" squares to end up with 32 half square triangles.
From the red and blue fabric: cut two 4 1/2" x 25" lengths, and two 2 1/2" x 25" strips
From the red fabric: cut one 3 1/2" x 42" (WOF) strips
SEWING
To make the tie, fold the red strip right sides together and sew or serge the long edge.
Press flat
Fold the unfinished edges of the tie to the inside, and run a straight stitch across the ends
To make the Broken Dishes Blocks, lay out a block so that you can see how it needs to be sewn together.
Place one blue and one red half square triangle right sides together and stitch along straight edge.
Repeat with second set.
Sew triangle units, right sides together, along long edge.
Lock opposing seams to get a perfect center alignment.
Here is what the finished center of the block should look like.
Add blue and red half square triangles to opposite sides of the center block.
Add third and fourth sides to the center block.
Back and front of finished block.
Stitch four of these Broken Dishes blocks together for the front of the dress, and four for the back.
For bottom hem strip: serge long edges of 3 ½” x 25” strips as you did in previous step. You do not need to finish the short edges as they will be encased in a seam.
For ribbon casing: before serging the long edges of the 2 ½” x 25” strips, turn short edges to inside and hem. These edges will not be stitched closed because the ribbon will be threaded through the casing. Serge long edges right sides together as you did in step above.
Stitch wide hems to bottom of dress front and back, right sides together. Press hem down.
Serge raw edges on sides of front and back of dress to finish.
Stitch sides of dress together , stopping three inches from top edge of dress.
Turn in serged edges to form a “V” for the armholes.
Add casing to top of dress, and thread fabric ribbon through both sides.
Gather front and back to fit, and tie ribbon over one shoulder.
Voila! Your finished quilt block pillowcase dress.
If you make one of these, I hope that you will share the pictures.


.jpg)
.jpg)

.jpg)
.jpg)
.jpg)
.jpg)
.jpg)
.jpg)
.jpg)
.jpg)
.jpg)


.jpg)
.jpg)
.jpg)


